Preconditions:
- Roof specified with either strategy:
-
-
Traced roof face(s) and roof outline
-
-
Site Equipment added
-
Weather Data completed
-
Site Info specified
Beginning the System Design
Begin building the array by selecting System Design on the bottom of the page.
-1.png)
Step 1: Specify System Size. This is the ideal target array size in kW DC, the exact array output will not be strictly tied to this, although, this is helpful to guide the app and is helpful for sales proposals. Move forward with the "Next" widget located on the bottom of the window.
Step 2: Specify Module by typing and selecting the particular module from the dropdown menu. Move forward with the "Next" widget located on the bottom of the window.
Step 3: Specify Racking System by choosing from the dropdown menu. If there's a racking missing that you'd like to see added, see our article covering new racking options. Move forward with the "Next" widget located on the bottom of the window.
Step 4: Specify Layout Orientation by choosing if modules will be in portrait or landscape and if modules will be aligned or offset. If in portrait layout, use the checkbox to allow landscape modules to be implemented in spaces where portrait cannot. For example if a row of landscape modules can fit underneath a row of portrait. Move forward with the "Next" widget located on the bottom of the window.
Note: When the Layout Orientation is specified it will apply to all modules in the design. If users want different layouts for different roofs, this can be achieved later in the Array Placement.
Select Roof Faces For Solar
If you've drawn or imported multiple roofs we'll start by selecting the roof faces where modules will be placed.
Note: The exact quantity and placement of modules is completed on the following step (Layout Design).
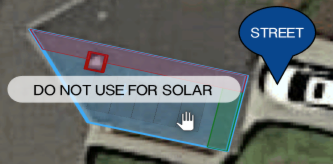
All previously drawn roofs will auto populate modules. If you’d like to disable module placement on a particular roof, you can use the DO NOT USE FOR SOLAR button to prevent module placement. Use the Select Tool and hover over the roof and click the DO NOT USE FOR SOLAR widget.

Change Layout Orientation for Individual Roofs
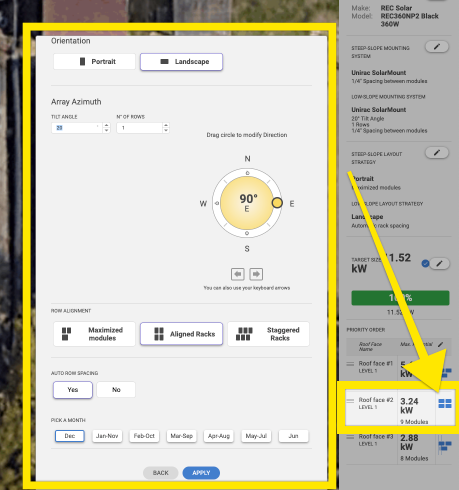
If a project has multiple roof faces that will use different layout orientations, for example modules in portrait on two roofs and modules in landscape on a third roof, that's possible with the individual roof layout orientation feature. In the example described above, set the layout orientation to portrait in Step 4 and proceed with the "next" widget. While in the Array Placement step, find the Priority Order section at the base of the properties panel. On right of the row for the roof face that needs the module orientation changed to landscape select the modules widget, shown below.
+-1.png)
Specifying Azimuth on Low Slope Roofs
When working with low slope roofs, the azimuth may need to be specified during the Array Placement step. In these situations, you can do so by clicking on the Layout Strategy area of that individual roof. To get there, click on the module symbol in the Roof Priority section, shown below.

A window will appear (as shown above on the left side of the image) that contains an azimuth compass which you'll use to specify what the azimuth of this array will be, since it can differ from the low slope roof it resides on. When you're finished click on the blue Apply button and the app will refresh the layout.
Change Roof Face Fill Priority
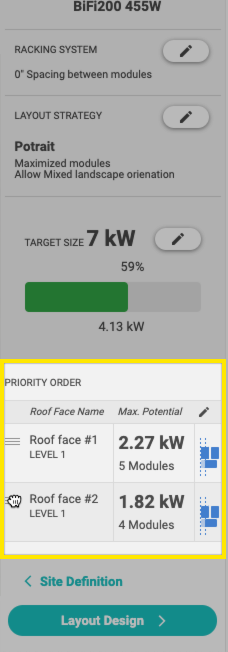
To arrange which roof has modules placed first, scroll to the bottom of your properties panel to the heading Priority Order and drag roofs into your desired order with the 3 line symbol.

On the Layout Design step, modules will populate the roof faces in the order that they appear in the Priority Order list until the target system size is met.
Editing Setbacks
Setbacks are automatically specified but can be edited by selecting the Setback Tool from the sidebar. The toolbar options change between the Site and System Design steps. The Setbacks Tool is located beneath the Panning Tool and shown below.

When the Setbacks Tool is selected, click on the setback you're trying to change. The Properties Panel will then show the setback distance of the selected setback and other distance options available.
Next Steps
After selecting the roof faces for solar, roof face fill priority, and module orientation we’ll move onto Layout Design where we’ll adjust module quantity, and individual module placement and orientation.
